Discover the ultimate comfort food that brings Italian culinary magic straight to your kitchen. Chicken Milanese is a mouthwatering dish that turns simple chicken into a crispy, golden masterpiece you’ll crave again and again.
This easy chicken milanese recipe combines tender chicken cutlets with a perfectly crisp exterior. It delivers maximum flavor in every bite. Whether you’re cooking for family or hosting a dinner party, this classic Italian dish promises to impress with its simple yet delectable preparation.
From its Northern Italian roots to your dinner table, crispy chicken milanese offers a delightful blend of texture and taste. It turns an ordinary meal into something extraordinary. You’ll learn how to create restaurant-quality results right in your own kitchen, with techniques that guarantee a golden, crunchy coating every single time.
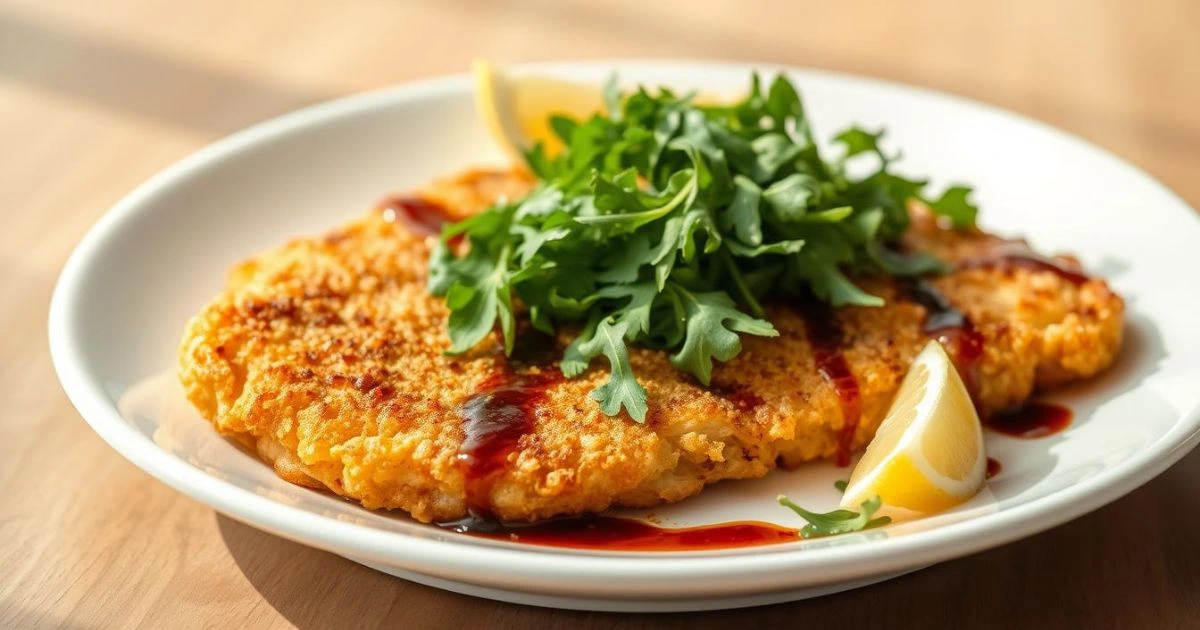
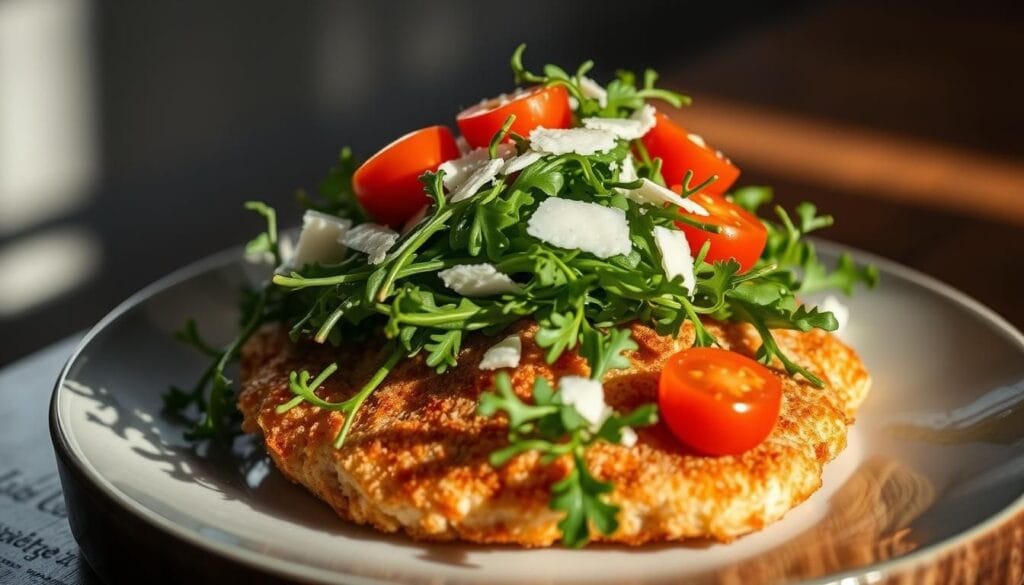
Imagine serving a plate of beautifully prepared chicken milanese topped with a bright arugula salad, a meal that looks gourmet but requires minimal cooking skills. Get ready to master this beloved Italian classic that’s sure to become a staple in your recipe collection.
Table of Contents
Chicken Milanese
Ingredients
Equipment
Method
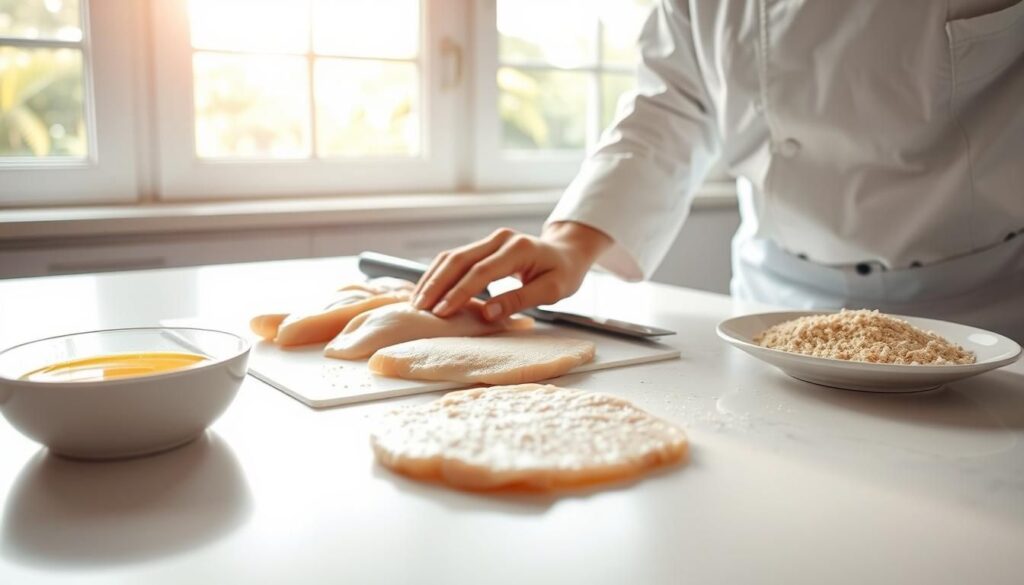
- Prepare Chicken Cutlets:Slice chicken breasts horizontally into thin fillets. Place between two sheets of plastic wrap and pound to about ⅜-inch thickness. Pat dry with paper towels.
- Season:Season both sides of the cutlets with salt, black pepper, and dried herbs.
- Set Up Breading Station:Place flour, beaten eggs, and panko breadcrumbs (mixed with Parmesan and herbs) in separate shallow dishes.
- Bread the Chicken:Dredge each cutlet in flour, then dip in egg, then coat with breadcrumbs.Press lightly to help the coating stick.
- Pan-Fry the Chicken:Heat ¼ inch of oil in a skillet over medium heat (350–375°F).Fry cutlets in batches for 3–5 minutes per side, until golden brown and cooked through (internal temp: 165°F).Drain on a wire rack or paper towels.
- Make the Salad:In a bowl, whisk olive oil, vinegar, Dijon mustard, salt, and pepper.Toss with arugula, cherry tomatoes, and shallots.
- Assemble & Serve:Place chicken cutlets on a plate, top with arugula salad, and garnish with lemon wedges and parsley.Serve immediately for the best crispiness.
Notes
- Use panko breadcrumbs for maximum crunch.
- Avoid overcrowding the pan to keep the coating crispy.
- For a lighter option, use an air fryer instead of frying in oil.
- Store leftovers in an airtight container for up to 3 days; reheat in oven at 375°F for 10 minutes to restore crispiness.
Understanding What Is Chicken Milanese
Chicken Milanese is a favorite Italian dish known for its simple yet flavorful taste. It comes from Milan, turning a basic chicken breast into a crispy, golden delight. This dish is loved by food fans all over the world.
Exploring chicken Milanese, you find a deep Italian culinary tradition. It’s more than a recipe; it’s a celebration of Italian cooking. It shows how simple ingredients can be elevated.
Origins and History from Milan
The name “Milanese style chicken” comes from Milan, where it was first made. Milanese cuisine is elegant yet simple. This chicken dish perfectly shows that philosophy.
Difference Between Milanese and Schnitzel
- Milanese: Italian origin, typically made with chicken or veal
- Schnitzel: Austrian origin, traditionally prepared with pork
- Breading technique: Similar, but Italian version often uses more herbs
Traditional Italian Preparation Methods
Making authentic Milanese style chicken is a careful process. Chefs pound chicken breasts to an even thickness. This makes sure they cook evenly and get crispy.
| Preparation Step | Traditional Technique |
| Meat Selection | Chicken breast, thinly sliced |
| Pounding | Even thickness, approximately 1/4 inch |
| Breading | Breadcrumbs, parmesan, herbs |
| Cooking Method | Pan-fried in olive oil |
Understanding chicken Milanese means seeing its beauty in simplicity. It’s a dish loved for its crispy outside and soft inside. It’s a key part of Italian cuisine.
Essential Ingredients for the Perfect Crispy Coating

Starting an amazing homemade chicken Milanese means picking the right ingredients. The key to a crispy coating is a mix of parts that turn a simple chicken breast into a tasty dish.
For a top-notch breaded chicken recipe, you’ll need:
- Boneless, skinless chicken breasts – the base for your crispy dish
- All-purpose flour – for the first coat
- Fresh eggs – to stick the breading
- Panko bread crumbs – for that extra crunch
- Seasonings like salt, black pepper, and dried herbs
Panko bread crumbs are a must for your chicken Milanese. They offer a crispy outside that stays crunchy longer. Their flaky texture makes your chicken’s coating golden and delicious.
Choose fresh, high-quality ingredients for the best taste and texture. The quality of your chicken and breadcrumbs affects your dish’s flavor and crunch. A great breaded chicken recipe balances flavors and texture for that perfect crunch.
Step-by-Step Guide to Preparing Chicken Cutlets
Starting your chicken milanese recipe is all about preparing your chicken cutlets right. With the right steps, you can turn a simple chicken dish into a gourmet meal. It’s easy to do at home.
Proper Chicken Breast Slicing Techniques
Begin with top-notch chicken breasts for your easy chicken milanese. Use a thin, sharp knife to slice each breast horizontally. This makes sure the cutlets are the same thickness and cook evenly.
- Select fresh, boneless chicken breasts
- Use a sharp chef’s knife
- Cut breasts horizontally to create thin fillets
Pounding for Perfect Thickness
To get the perfect cutlet, you need to pound it gently. Place the sliced chicken between two pieces of plastic wrap. Then, use a meat mallet or rolling pin to make it ⅜-inch thick.
“The secret to a great chicken milanese is uniform thickness – it ensures perfect cooking every time.” – Professional Chef
Seasoning Your Chicken
Seasoning is key for a tasty chicken milanese recipe. Sprinkle both sides of the cutlets with salt, black pepper, and your favorite herbs. This step lays the flavor foundation before breading.
- Pat chicken dry with paper towels
- Season generously with salt and pepper
- Add dried herbs like oregano or parsley
By following these steps, you’ll make chicken milanese that’s crispy, flavorful, and easy to make at home.
The Three-Step Breading Process

Learning to bread chicken is all about mastering the three-step process. This method turns simple chicken into a crispy, restaurant-style dish.
The breading technique is an art. It keeps your chicken crunchy and full of flavor. Each step is key to a perfect crispy coating:
- Flour Dredging: The first layer makes a dry surface for the egg to stick to
- Egg Wash: It binds the flour and breadcrumbs together
- Breadcrumb Coating: This gives the chicken its crispy outside
Using panko breadcrumbs is a pro tip. These Japanese breadcrumbs make your chicken milanese light and crispy.
Here are some tips for perfect breading:
- Make sure the chicken is dry before you start
- Use different plates for each breading step
- Shake off extra flour and breadcrumbs
- Press the breadcrumbs gently for full coverage
By following these steps, you’ll get a crispy, golden, and tasty breaded chicken dish.
Choosing the Right Oil for Frying
Making the perfect homemade chicken milanese needs careful oil selection and temperature control. The right oil can change the taste and texture of your crispy chicken cutlets.
For a chicken milanese recipe, pick an oil that can handle high heat without burning. Good choices include:
- Vegetable oil – neutral flavor and high smoke point
- Light olive oil (not extra-virgin) – adds subtle Mediterranean taste
- Clarified butter – provides rich, golden color
Optimal Temperature Control
Keeping the oil at the right temperature is key for a perfect golden-brown crust. Aim for 350-375°F. Use a cooking thermometer to get it right and avoid soggy or burnt chicken milanese.
Selecting the Ideal Cooking Pan
Go for a heavy-bottomed skillet for even heat. Cast iron or stainless steel pans are best for homemade chicken milanese. The pan should be big enough to cook cutlets without overcrowding, so each piece can crisp up well.
Pro tip: Heat about 1/4 inch of oil in the pan over medium heat. This depth is enough for even cooking and prevents too much grease.
Pan-Frying Techniques for Golden Brown Results
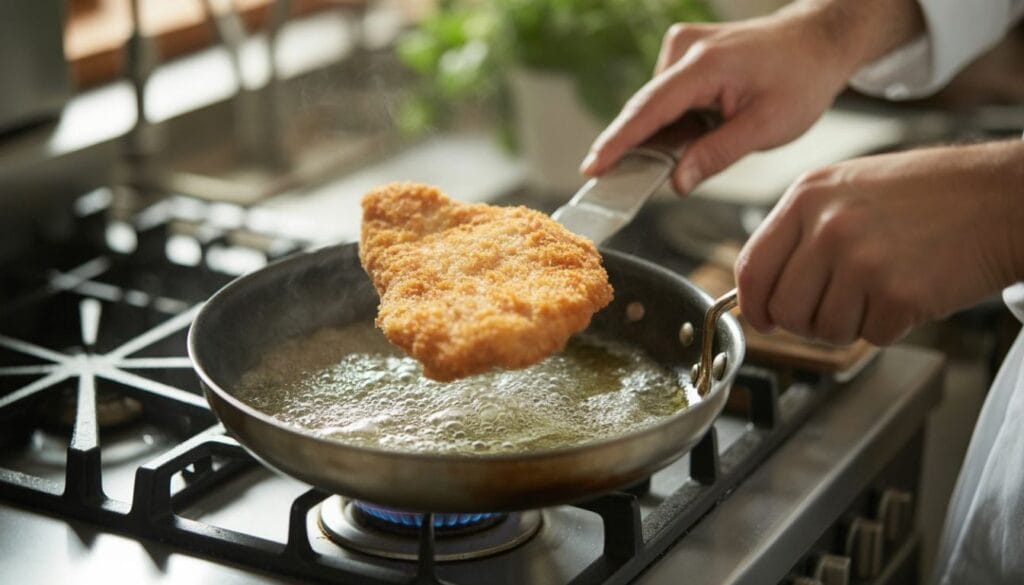
Learning to pan-fry is key to making a real classic chicken milanese. It’s all about getting that golden-brown outside. This turns a simple chicken cutlet into a dish to remember.
Here are some top tips for pan-frying your chicken milanese:
- Use a heavy-bottomed skillet for even heat distribution
- Maintain oil temperature between 350-375°F
- Fry chicken cutlets in small batches to prevent overcrowding
- Allow 3-5 minutes of cooking per side for optimal crispiness
Getting that golden crust takes patience and skill. Don’t rush the frying process. Heat your oil until it shimmers but doesn’t smoke. Then, gently put the breaded cutlets in the pan. You’ll know the oil is ready when you hear a nice sizzle.
Keep an eye on your chicken as it fries. You want it to turn a beautiful golden-brown color. Only flip the cutlets once to keep the breading crispy. Then, drain them on a wire rack or paper towels to stay crisp.
“The perfect pan-fried cutlet should be golden, crispy, and never greasy.” – Italian Culinary Tradition
Pro tip: Use a meat thermometer to check the chicken’s internal temperature. It should be 165°F for safety and to keep it juicy inside.
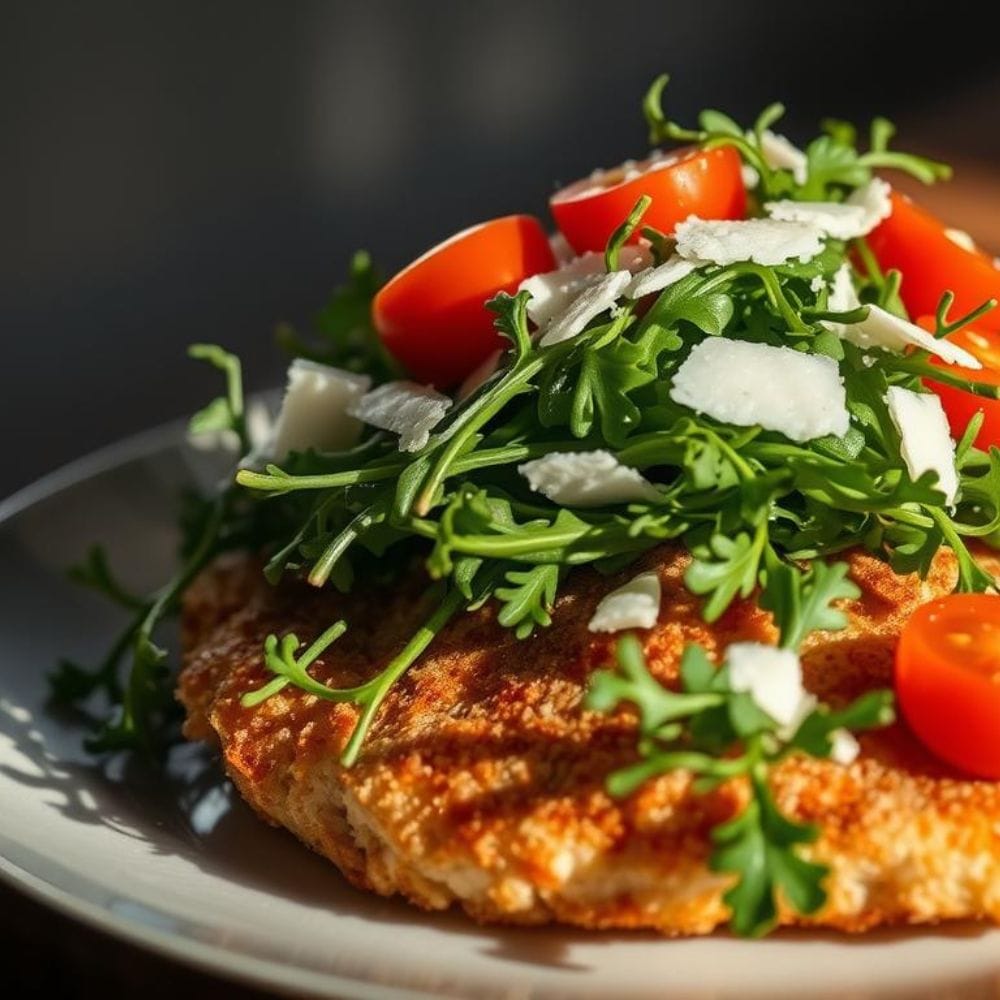
Creating the Perfect Arugula Salad Topping
Your chicken Milanese with arugula salad needs a fresh, vibrant topping. The right salad can make a simple meal feel like a restaurant dish. It adds brightness and cuts through the richness of the fried chicken.
Fresh Ingredient Selection
Choosing top-quality ingredients is key for a great arugula salad. Here are the essentials:
- Crisp, peppery arugula leaves
- Ripe cherry tomatoes
- Delicate shallots
- High-quality extra virgin olive oil
Homemade Vinaigrette Recipe
Make a simple yet tasty vinaigrette to enhance your salad. The best dressing has the right mix of acidity and richness.
| Ingredient | Quantity |
| Extra virgin olive oil | 3 tablespoons |
| Balsamic vinegar | 1 tablespoon |
| Dijon mustard | 1 teaspoon |
| Salt | 1/4 teaspoon |
| Black pepper | Pinch |
Whisk all ingredients until smooth. Pour it over your arugula salad just before serving. This way, every bite of your Italian chicken dish is full of fresh, zesty flavor.
“A great salad is the perfect counterpoint to a crispy chicken Milanese” – Italian Culinary Tradition
The peppery arugula and tangy vinaigrette pair perfectly with the golden, crispy chicken. Your meal will be a true culinary delight.
Air Fryer Method for Lighter Version
Want to enjoy an easy chicken milanese with less oil? The air fryer is a great alternative to traditional pan-frying. It keeps your crispy chicken milanese delicious but healthier.
Air frying uses minimal oil but still gives that golden-brown crunch. This method cuts calories without losing flavor or texture. It’s ideal for those who care about their health but still love tasty food.
Air Fryer Cooking Steps
- Prepare chicken cutlets as usual with standard breading process
- Lightly spray breaded cutlets with cooking oil
- Preheat air fryer to 390-400°F
- Cook for 10-15 minutes, flipping midway
Key Benefits of Air Frying
- Reduces total oil consumption
- Cuts down cooking time
- Easy cleanup
- Maintains crispy exterior
Pro tip: For the crispiest results, ensure your chicken cutlets are evenly coated. Don’t overcrowd the air fryer basket. A light spray of oil helps achieve that perfect golden-brown finish.
| Cooking Method | Oil Usage | Cooking Time | Crispiness Level |
| Pan Frying | High | 8-10 minutes | Very Crispy |
| Air Frying | Low | 10-15 minutes | Crispy |
Your easy chicken milanese can now be a guilt-free pleasure. It doesn’t skimp on taste or texture. The air fryer method proves you can enjoy a crispy chicken milanese without excessive oil.
Serving Suggestions and Plating Tips
Presenting your classic chicken Milanese is more than just taste. It’s about making a dish that looks amazing and feels special. The right plating can turn a simple meal into a stunning work of art.
Begin by putting your crispy Milanese style chicken on a clean white plate. The golden-brown cutlet should be the main attraction. Add a fresh arugula salad on top, letting the greens spill over the edges.
- Garnish with fresh lemon wedges on the side
- Sprinkle finely chopped parsley for color
- Add a light drizzle of extra virgin olive oil
To keep your chicken crispy, serve it right after cooking. If you can’t, put the cutlets on a wire rack to avoid sogginess. Your guests will love the care you put into presenting your Milanese style chicken.
Storage and Reheating Guidelines
Keeping your easy chicken milanese crispy is key. You need to store and reheat it right. This way, you can enjoy it more than once, just like the first time.
- Store in an airtight container immediately after cooling
- Separate crispy chicken from salad or garnishes
- Refrigerate within two hours of cooking
- Keep leftovers for maximum 3 days
Maintaining the Perfect Crispiness
Reheating chicken milanese can be tricky. The microwave will ruin the crispy coating. Instead, try these methods:
- Preheat oven to 375°F
- Place chicken on a wire rack
- Warm for 10-12 minutes until heated through
- Optional: Briefly pan-fry to restore extra crispiness
Best Practices for Leftovers
Keep your easy chicken milanese fresh with these tips:
| Storage Method | Duration | Quality Preservation |
| Refrigerator (Airtight Container) | Up to 3 days | Good |
| Freezer | Up to 2 weeks | Fair |
By following these tips, your homemade chicken milanese will stay delicious. You can enjoy it many times.
Conclusion
Now you can make a real Chicken Milanese at home. This easy recipe turns simple chicken into a top-notch Italian dish. It will wow your family and friends.
Chicken Milanese is great for any meal. You can fry it in a pan or use an air fryer. Both ways make it crispy on the outside and juicy inside, just like in Italy.
With what you’ve learned, you can try new toppings and sides. Add a fresh arugula salad or a lemon wedge to make it special. Follow the steps to make a perfect Chicken Milanese every time.
Cooking is all about trying new things and having fun. Start your Chicken Milanese adventure today. Get your ingredients ready, heat your pan, and enjoy making Italian food at home. Bon appétit!
FAQ
What is Chicken Milanese?
Chicken Milanese is a dish from Italy. It has thin chicken cutlets that are breaded and fried until they’re golden and crispy. It’s served with fresh arugula salad and lemon wedges, making it a tasty meal.
How is Chicken Milanese different from schnitzel?
Chicken Milanese is made with chicken, while schnitzel is made with veal or pork. The breading and seasoning are also different, showing the unique flavors of each dish.
What type of breadcrumbs work best for Chicken Milanese?
Panko breadcrumbs are the best for Chicken Milanese. They make the coating extra crispy and light. This gives the dish a crunchy texture that’s hard to beat.
Can I make Chicken Milanese without frying?
Yes, you can make a lighter version using an air fryer. It produces a crispy exterior with less oil. This makes it a healthier choice without losing the crunch.
How do I keep my Chicken Milanese crispy?
To keep it crispy, don’t overcrowd the pan and use hot oil (around 350°F). Place the fried cutlets on a wire rack to prevent steaming. Reheat in an oven or air fryer to restore crispiness.
What should I serve with Chicken Milanese?
Serve it with an arugula salad, cherry tomatoes, and a light vinaigrette. Lemon wedges, roasted vegetables, or pasta are also great options.
How long can I store leftover Chicken Milanese?
Store it in an airtight container in the fridge for 2-3 days. Keep the cutlets and salad separate. Reheat in an oven or air fryer to keep it crispy.
Is Chicken Milanese difficult to make at home?
No, it’s easy to make at home. Just follow the three-step breading process, keep the oil hot, and fry in batches. This way, you can make it just like a restaurant.
There are no reviews yet. Be the first one to write one.